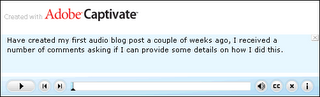
Following a number of requests todays post outlines how to create an audio blog post using Adobe Captivate 2.
I’ve just finished the first leg of the Adobe Acrobat 8 Tour where I had the privilege of introducing attendees to Adobe Captivate 2 and demonstrate how Captivate fits in the Adobe Connect family. This first leg of the tour took place in London in Regents Park. As you can probably tell from my previous blog posts I love talking about Captivate and it is always a joy when I have the opportunity to introduce new users to the program; not to mention showing existing Captivate developers some of the many new features that Adobe have introduced in Captivate 2 not to mention showing how Captivate 2 can be integrated into the Adobe Connect (formerly Macromedia Breeze) workflow.
The next leg of the tour takes me to Leeds on November 9 followed by Manchester 28 November so for those who are registered for those dates I look forward to seeing you there.
Without this sounding like the award ceremony at the Oscars I do want to take this opportunity to also thank all those who attended my sessions in Regents Park and to Adobe UK for making me feel so welcome. I look forward to catching up with you again later this month.

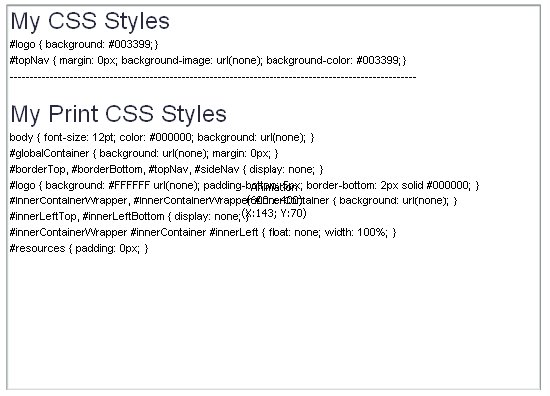
Last weeks lack of posts were primarily due a project on teaching WebAssist users how they can customizing pure CSS layouts generated using SiteAssist 3.0. In a couple of the segments of this tutorial series I really wanted learners to have the opportunity to grab the customized CSS code that we had used to customize the web page layouts but how to do that in Adobe Captivate? Well the simple answer is that in Adobe Captivate alone you just cannot do it the solution was create these in Flash 8 using the Text Area component and add them to my project file.
This is something that I had experimented with in Captivate 1.0 and although I could insert the published text area component (SWF) as an animation when I tried and preview the text area just would not show. Publishing didn’t help that much either. In a published file although the text in the text area box was there, the learner couldn’t see it and asking them to select what appeared to be invisible text and pasting this into a text file just didn’t sit right with me.
In Adobe Captivate 2, the text area component is handled much better, the text area and the text is rendered correctly either when you preview and publish as a SWF or you publish to Adobe Connect Professional.
One thing that you have to bear in mind is that when you publish locally you must include the published text area SWF. Internally I believe that Captivate references the published component the same way the program does with Flash video files. Something I found out when I sent my test Captivate 2 file to my colleague and good friend Joseph Lowery, only to find that Joe could not see the text area / code box I had inserted into my Captivate project file.
Below are two sample files that show this technique in practice. Although the ActionScript code included in the sample Flash file works, I have since found a better way to handle CSS in Flash, which I will make available once I have had the chance to do some more testing.
Want to find out all about the new Library panel in Adobe Captivate 2, then read my latest Captivate article now available at the Captivate Developer Center.
More Captivate 2 posts coming soon
No this isn’t a rant about problems with Adobe Captivate 2, far from it. I have just finished creating my first real-world project, the WebAssist.com solution recipe PayPal Websites Payments Pro. Using any piece of software on a real project (opposed to testing the software during the development cycle) can be a daunting experience. Does the software live up to it’s expectations? Do the new features really improve the user’s workflow and most importantly when used under normal working conditions does the application remain stable?
Well, in the case of Adobe Captivate 2 I am happy to say that this project the program performed really well. I am still amazed at how quickly Captivate 2 saves project files, even those that during development consisted of over 140 slides still saved in a fraction of the time they used to in Captivate 1 and, as for the new Library feature – well you’re going to have to wait a little while longer before I talk about that one.

Today’s Adobe Captivate 2 feature focuses on Previewing. When working on a project there as many instances when you only want to preview a certain amount of slides; although with Captivate 1.x you could preview the next five slides, there were many occasions when this simply wasn’t enough.
To address this issue in Adobe Captivate 2 you the user can now specify how many next slides the program should preview.
Another option in this dialog, is the ability to specify the default duration for newly created blank, image and question slides.
One of the reasons why I decided to start using Captivate over other screen recording tools was because Captivate enabled me to create truly interactive simulations. For the past 8 years, I had been creating video-based tutorials for my former employer Virtual Training Company.
Whilst I have nothing against creating demonstration tutorials, the chance to create interactive simulations was something that for many years I had wanted to explore. So, needless to say having discovered Captivate and been offered the chance to create some interactive content, I leapt at the opportunity.
Last year one of the interactive projects I got to work on was the Dreamweaver 8 Getting Started series. Whilst Captivate enabled me to create a “fairly realistic” series of tutorials, I kept hitting two major problems:
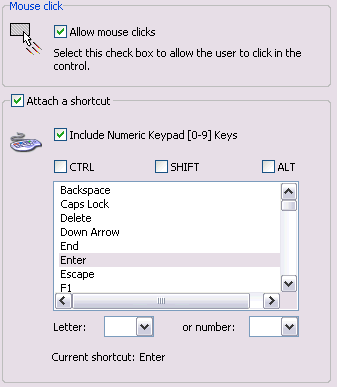
Thankfully, in Adobe Captivate 2 all this changes. Adobe Captivate 2 enables you to apply both a mouse click and keyboard short cut to the same object.
What is even more exciting is that you can also include the numeric keypad as part of your keyboard shortcut combination and ensures that the learner's experience is incredibly realistic!
For example it means that as well as learners being able to press say the Return key on their keyboard, they can also press the Enter key on the numeric keypad instead, which of course, is what many users in the real world do!
Although Captivate 1.0 you could send a learner to another branch (part / section) in your project, using interaction objects such as click boxes, text entry boxes etc; if a learner landed on say slide 20 and you wanted to send them to say slide 45, and you didn’t want them to interact with the project, you were pretty well sunk.
In Adobe Captivate 2, the Captivate team has dealt with this limitation by including automatic slide branching. Now, if the learner lands on slide 75 and you want to send them to say slide 25 you can do so by simply setting the Slide navigation option to Jump to Slide 25 in the Slide Properties dialog.

The level of flexibility this offers is truly breath taking and provides Captivate developers with the ability to create paths that can seamlessly merge back onto a path in a previous or main section.
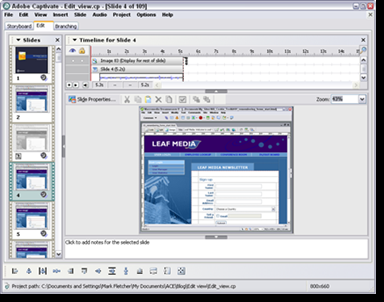 Today, I will reveal some of the cool new features that you will find in the Adobe Captivate 2 Edit view.
Open Adobe Captivate 2 and the first thing that you will notice is that at the very top of the view you now have a toolbar. This offers a convenient way to perform basic tasks such as cutting, copying, arranging objects, displaying object and slide properties as well as showing/hiding the grid and snapping objects to the grid. Over on the right hand side of the tool bar is a magnification menu enabling you to zoom in and out of your slide – you can also choose Best Fit.
However, this is one extra little surprise. Select any object and you will notice that the position and size text fields also appear. This means that for the first time you can position and size your objects with pixel level accuracy.Another great addition in Adobe Captivate 2 is the ability to float the Filmstrip. This is an ideal feature for those who have two monitors or very large screens. Simply tear-off the Filmstrip, drag it to the desired location and resize it.
Lastly, one of the great little new tools is the Go to Slide option. Located in the Edit menu and available by pressing Ctrl + Shift + G, this ensures that have to scroll through the Filmstrip trying to locate the desired slide is a thing of the past. It might be a small feature but it is a great timesaving tool that many Captivate users will be thankful for.
For all those who create quizzes in Captivate here is a sample Quiz created in Adobe Captivate 2.
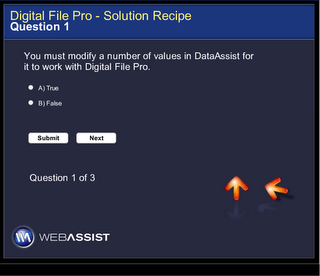
>Creating quizzes used to drive me nuts, you could never get contents of the question slides to align correctly and although you could apply a background image to the questions because the Results slide was only generated at run-time (when you preview or publish) typically many Captivate users would just leave this slide with it's default white background color.
Well, with Adobe Captivate 2 all that changes, as you now have the ability to position all your slide objects with pixel-level precision and most importantly the Results slide is now included in the Edit view so adding background image and aligning your result object in their desired locations is no longer a problem.

In this example I show the following
Pause during Capture: In Adobe Captivate 2 you can press the Pause key on your keyboard to move the red capture rectangle and then resume the capture by pressing the Pause key again.
Today whilst trawling around the Captivate Developer's Center, I came across a new Right-Click menu article - Using Animations to Extend Macromedia Captivate for Right-Click Capability. This technique uses an animation to enable Captivate users to add right-click functionality to their projects. If you haven't seen this one yet, it is definitely worth taking a look! I've only done some basic testing on the techniques used but so far, so good!
